


Let’s talk about the dreaded “P-word” of homeownership: Plumbing.
If you are a millennial who recently managed the Herculean task of getting onto the property ladder, congratulations! You are now the proud owner of a mortgage, a front door, and, in all likelihood, a bathroom that looks like it hasn’t been updated since 1998. The avocado green suite might be gone, but the salmon-pink tiles, the crusty linoleum, and the aggressively generic mirror cabinet remain.
You want to renovate. But when you start looking at tradesmen quotes, the reality of bathroom renovations hits hard. Ripping out a bathroom costs thousands. Moving pipes requires a plumber, who charges a call-out fee just to look at your toilet. Tiling requires a wet saw and patience that you simply do not have.
But what if you didn’t need to rip anything out? What if you didn’t need to touch a single copper pipe?
Welcome to the cosmetic bathroom refresh. This is a guide for the DIY beginner who is terrified of causing a leak but desperate for an aesthetic upgrade. Armed with a budget of £500, a weekend of free time, and a trip to B&Q, you can completely transform your bathroom. No plumbers, no wet saws, no crying over a burst pipe.
Here is exactly how to execute a high-impact, low-cost bathroom makeover.
The Realistic £500 B&Q Budget Breakdown
Before we put on our DIY clothes, let’s prove the math. Bathroom makeovers spiral out of control when you change the footprint (moving the toilet or shower). By keeping everything exactly where it is and focusing entirely on surfaces and fixtures, we keep the budget incredibly tight.
Here is a realistic estimate for a standard UK bathroom using materials readily available at B&Q:
- Tile Paint & Preparation (Sugar soap, brushes, rollers): £50
- A Statement Mirror or Modern Wall Cabinet: £80 – £120
- Matte Black or Brushed Brass Showerhead & Hose: £40 – £60
- Click-and-Lock Luxury Vinyl Flooring (LVT) & Underlay (approx. 4 sqm): £150 – £180
- Accessories (New towel ring, toilet roll holder, bath mat, silicone sealant): £90
- Total: Comfortably under £500.
Now, let’s break down the weekend itinerary.
Project 1: The Magic of Tile Paint (Say Goodbye to 90s Motifs)
Ripping out tiles is a nightmare. It destroys the drywall behind it, creates clouds of toxic dust, and requires a professional to make the wall flat again before re-tiling.
If your tiles are fundamentally sound, meaning they aren’t falling off the wall and the grout isn’t crumbling into dust, you do not need to remove them. You need to paint them. Tile paint technology has advanced lightyears in the last decade. Brands like V33 or Ronseal (both stocked in the B&Q paint aisles) offer highly durable, waterproof tile paints that do not require a primer.
How to Do It Like a Pro:
- The Purge: You have to remove the old silicone sealant around the bath and sink. Paint will not stick to silicone; it will just pool and peel. Use a cheap sealant removal tool and some elbow grease.
- The Scrub Down: This is the most important step of the entire weekend. Wash the tiles with sugar soap. You must remove decades of shampoo residue, body oils, and limescale. If the surface isn’t surgically clean, the paint will chip.
- Tape it Off: Use high-quality masking tape (like FrogTape) around the edges of the ceiling, the bathtub, and the sink.
- Roll it On: Use a small foam roller designed for gloss or smooth surfaces. A brush will leave streaks. Apply a thin, even coat. It will look terrible after the first coat. Do not panic. Let it dry according to the tin’s instructions, then apply the second coat.
- The Finishing Touch: Once fully dry, re-seal the bath and sink with fresh, anti-mould sanitary silicone.
The Result: A stark, bright white (or moody dark green) wall that makes the room feel instantly twice as large and a decade newer.
Project 2: The 10-Minute Showerhead Swap
One of the biggest giveaways of a tired bathroom is a calcified, plastic chrome showerhead on a flimsy slider rail. Replacing this feels like a plumbing job, but it is actually one of the easiest DIY tasks in existence.
Unless you are changing the actual mixer valve hidden inside the wall, swapping the showerhead, hose, and riser rail requires absolutely no plumbing expertise. It is basically Lego for adults.
The B&Q Upgrade Strategy:
Head to the plumbing fixtures aisle and look for a modern finish. Matte black adds immediate contemporary contrast to a white bathroom, while brushed brass adds warmth.
- The Hose and Head: The hose simply unscrews from the wall outlet or bath tap. You might need an adjustable spanner to loosen it if it’s been there for years. Crucial Tip: Wrap a tea towel around the nut before you put the spanner on it so you don’t scratch the metal.
- PTFE Tape: Buy a roll of PTFE tape (plumber’s tape) for about £1. Wrap it around the thread of the water outlet two or three times before screwing the new hose on. This ensures a watertight seal and guarantees no drips. Just hand-tighten the new hose; over-tightening with a wrench can crack the plastic washers inside.
- The Riser Rail: To replace the metal bar that holds the showerhead, look at how the old one is attached. Usually, there are caps at the top and bottom that pop off to reveal standard screws. Unscrew them, take the bar down, and screw the new one in.
- DIY Hack: Try to buy a replacement riser rail with adjustable brackets. This allows you to slide the brackets to match the exact holes left by the old rail, saving you from having to drill new holes into your freshly painted tiles!
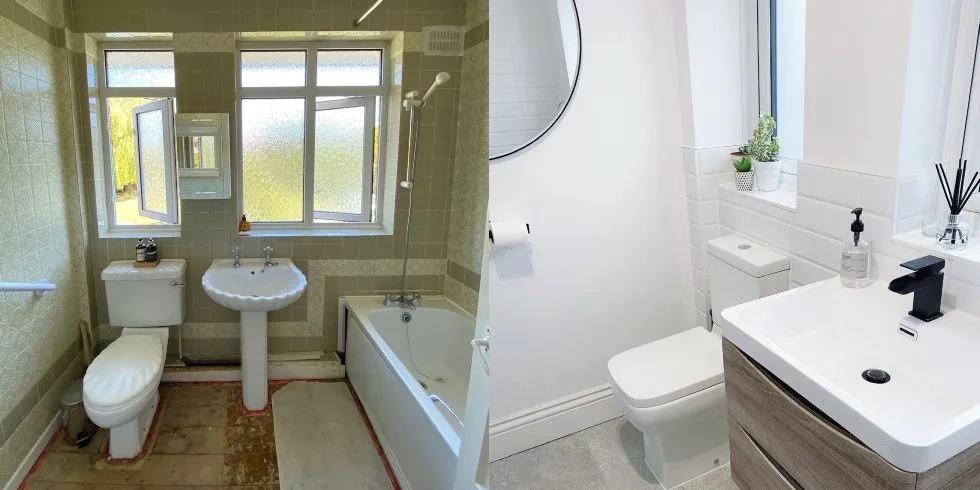
Project 3: Ditching the Builder-Grade Mirror
Nothing drags down a bathroom aesthetic faster than a cheap, rusty-edged mirror screwed directly into the wall, or a clunky plastic medicine cabinet that looks like it belongs in a budget motel.
Replacing the vanity mirror is an immediate focal point upgrade. For under £100, you can find massive, beautiful round mirrors or sleek wooden cabinets that add desperately needed storage and warmth to the room.
The No-Wire Lighting Hack:
If you want that luxury hotel look but don’t want to hire an electrician to wire in a back-lit mirror or wall sconces, fake it. Buy a beautiful, standard mirror. Then, buy battery-operated or USB-rechargeable LED picture lights or sconces. Mount them directly above or beside the mirror. You get the high-end aesthetic of layered bathroom lighting without touching a single wire.
Drilling into Tile (Without Cracking It):
If your new mirror or cabinet requires new holes, drilling into tile can be intimidating. Here is the foolproof method:
- Put a piece of masking tape over the spot you want to drill. This gives the drill bit traction so it doesn’t slip and scratch the tile.
- Use a dedicated masonry drill bit or a diamond-tipped tile bit. (Do not use a standard wood bit; you will ruin it and the wall).
- Turn off the “hammer” function on your drill. You want a smooth, steady rotation.
- Drill slowly and steadily until you punch through the tile and into the drywall or brick behind it. Insert a rawlplug, and you are ready to hang your new focal point.
Project 4: The Floor Faux-Pas Fix (Click-and-Lock LVT)
You’ve painted the tiles, swapped the showerhead, and hung a gorgeous new mirror. But if you look down and see peeling linoleum from 2004, the illusion shatters.
Replacing bathroom flooring used to mean ripping up the subfloor or meticulously laying ceramic tiles with wet mortar and grout. Not anymore. The greatest gift to the DIY beginner is Luxury Vinyl Tile (LVT) with a click-and-lock system.
LVT is 100% waterproof, warm underfoot, and designed to look incredibly like real wood or stone. Best of all? It is a “floating floor.” This means it doesn’t need to be glued down. It simply clicks together and sits directly on top of your existing hard flooring.
How to Lay LVT in a Weekend:
- Prep: Give the existing floor a deep clean. If there are massive gouges or missing tiles, fill them in with a quick-drying levelling compound so you have a relatively flat surface.
- Underlay: Buy an underlay specifically designed for LVT (it’s much thinner than carpet underlay). This stops the floor from clicking when you walk on it.
- The Click System: Start in the most visible corner. The planks simply angle, slot into each other, and snap flat.
- Cutting Without Saws: You do not need a power saw. To cut an LVT plank, you simply measure it, score the top deeply with a heavy-duty Stanley knife and a metal ruler, and snap it. It breaks cleanly along the scored line.
- The Edges: Because you aren’t removing the skirting boards, you will need to leave a tiny expansion gap (about 5mm) around the edge of the room. To hide this gap, buy a reel of B&Q’s white PVC quadrant beading. Stick it to the skirting board (not the floor!) with grab adhesive, and your floor will look seamlessly integrated.
The Final Polish: Details Matter
With your remaining £90, it is time to banish the last remnants of the old bathroom.
If you changed your showerhead to matte black, your tap, towel ring, and toilet roll holder need to match. B&Q sells budget-friendly accessory sets that unify the room’s hardware. Buy a plush new bath mat to complement your new LVT flooring, add a trailing pothos plant (they thrive in bathroom humidity) to the top of your new cabinet, and fold some fresh white towels.
The Psychological Payoff
The beauty of the £500 cosmetic refresh is not just financial; it is psychological. Living in a house with a room you hate is draining. It makes you feel like you aren’t truly settled.
By taking matters into your own hands, armed with tile paint, a Stanley knife, and a Saturday afternoon, you conquer the space. You learn that a house is malleable. You learn that you don’t need to be at the mercy of expensive tradesmen for every single upgrade.
So, put down the plumber’s phone number, pick up a roller, and reclaim your bathroom.